Overview: In wizard mode, user is presented a series of pages in a sequence to enter the data. On the last page, there is a form to submit the request. User can click previous/back buttons on intermediate pages to navigate to different pages. Using Crow Canyon NITRO Forms, this experience can be easily configured.
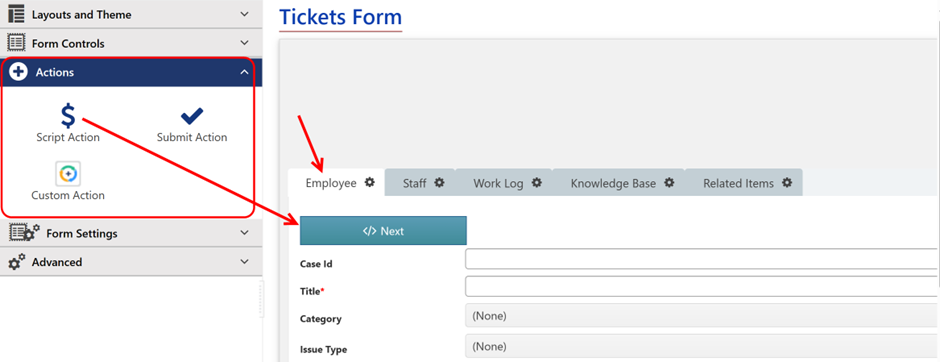
1.Create a NITRO Form and add various pages as Tabs on the Form in the required sequence
2.On first Tab, add one script action (to go to next tab)
3.On intermediate Tabs, add two script actions (for previous and next)
4.On last Tab, add one script action for going back to previous Tab and one Submit action to save the request
Script Configurations:
In Forms designer, go to Advanced panel on left side then --> click on "Custom JavaScript". Select "Custom Script As" Eval and use below script.
formContext.hideAllTabsORSections();
For Script actions to go to next Tab, configure below script for the action
formContext.showNextTabORSection();
functionCallback(false);
For Script actions to go to previous Tab, configure below script for the action
formContext.showPreviousTabORSection();
functionCallback(false);
For Submit action, if you want to update any hidden column value, then use below script:
var returnDataObj = {};
returnDataObj[[ColumnInternalName]] = valueforColumn;
functionCallback(false,returnDataObj);
Just enter the call to return control to NITRO Forms
functionCallback(false);
CSS Configurations:
In Forms designer, go to Advanced panel on left side then click on "Custom CSS" and use the below CSS.
#panelCCSTabs > .k-item {
width: calc(100% - 20px);
border-bottom: 1px #9f9f9f solid;
margin-left: 10px;
text-align: center;
}
button.ccs_btn_ScriptAction {
background: #253cc6;
}
button.ccs_btn_ScriptAction:hover {
background: #0620ba;
}
button.ccs_btn_SubmitAction {
background: green;
}
button.ccs_btn_SubmitAction:hover {
background: #0d7e0d;
}
Sample Example:
Use Case 1: Show all the tabs along with the ‘Next’ and ‘Previous’ buttons.
1.To configure ‘Next’ button in ‘Employee’ tab
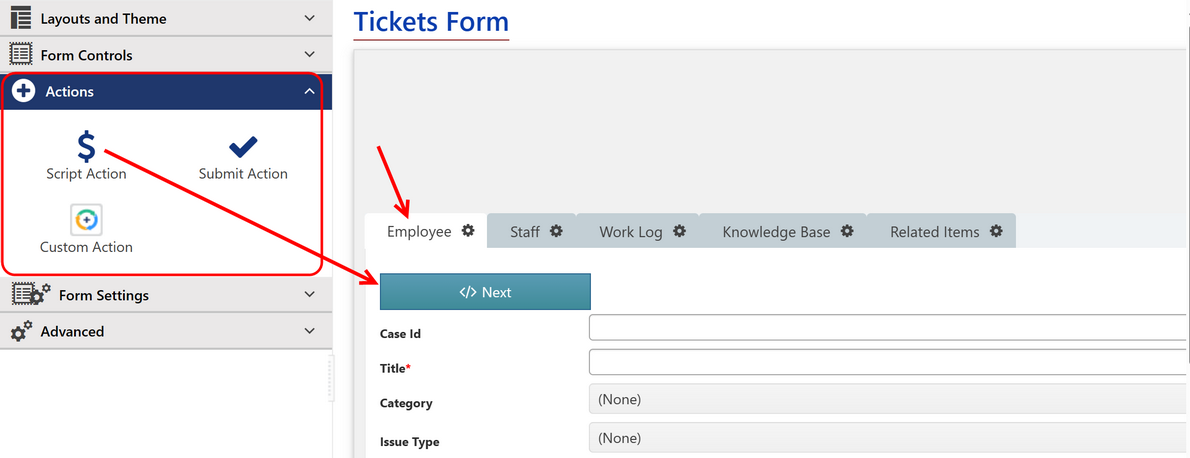
Navigate to NITRO Forms designer for the ‘Tickets’ list à On ‘Employee’ tab, Drag and drop ‘Script Action’ button from ‘Actions’ dropdown in left side panel.
2.Select the ‘Script Action’ button to edit the settings. In right side panel, you can edit settings for this button.
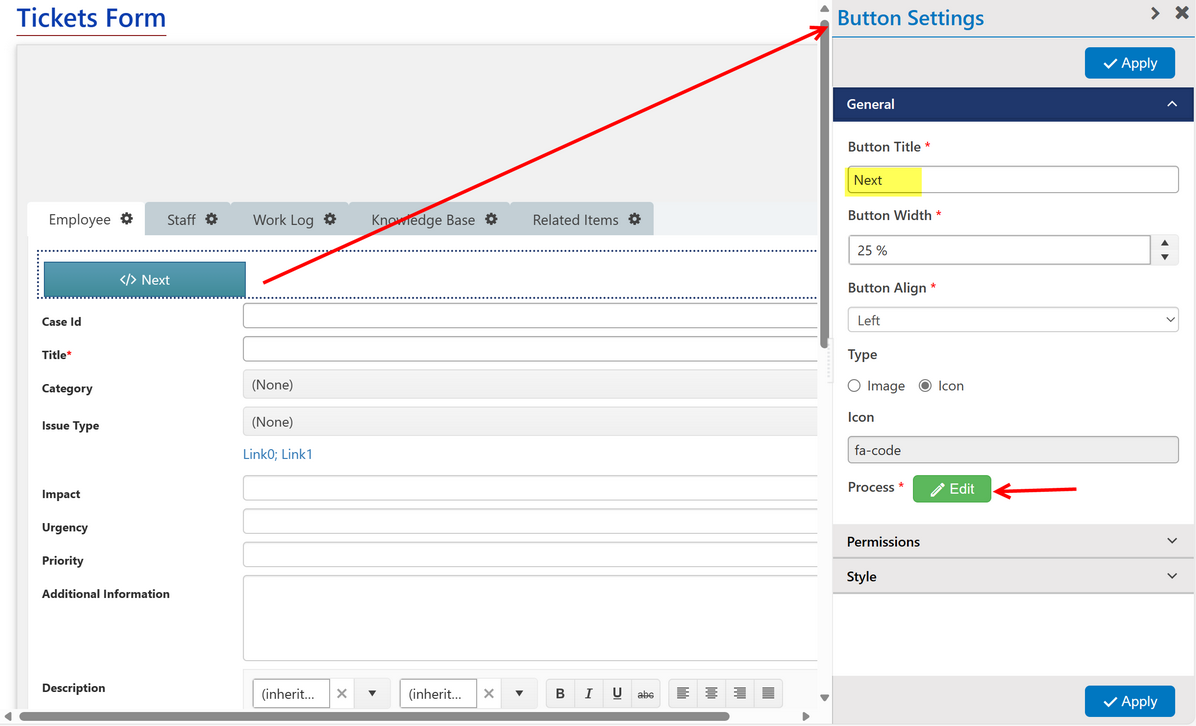
3.Specify Button Title as ‘Next’ and click ‘Edit’ button beside ‘Process’. In the opened window specify the JavaScript for ‘Next button as shown below.
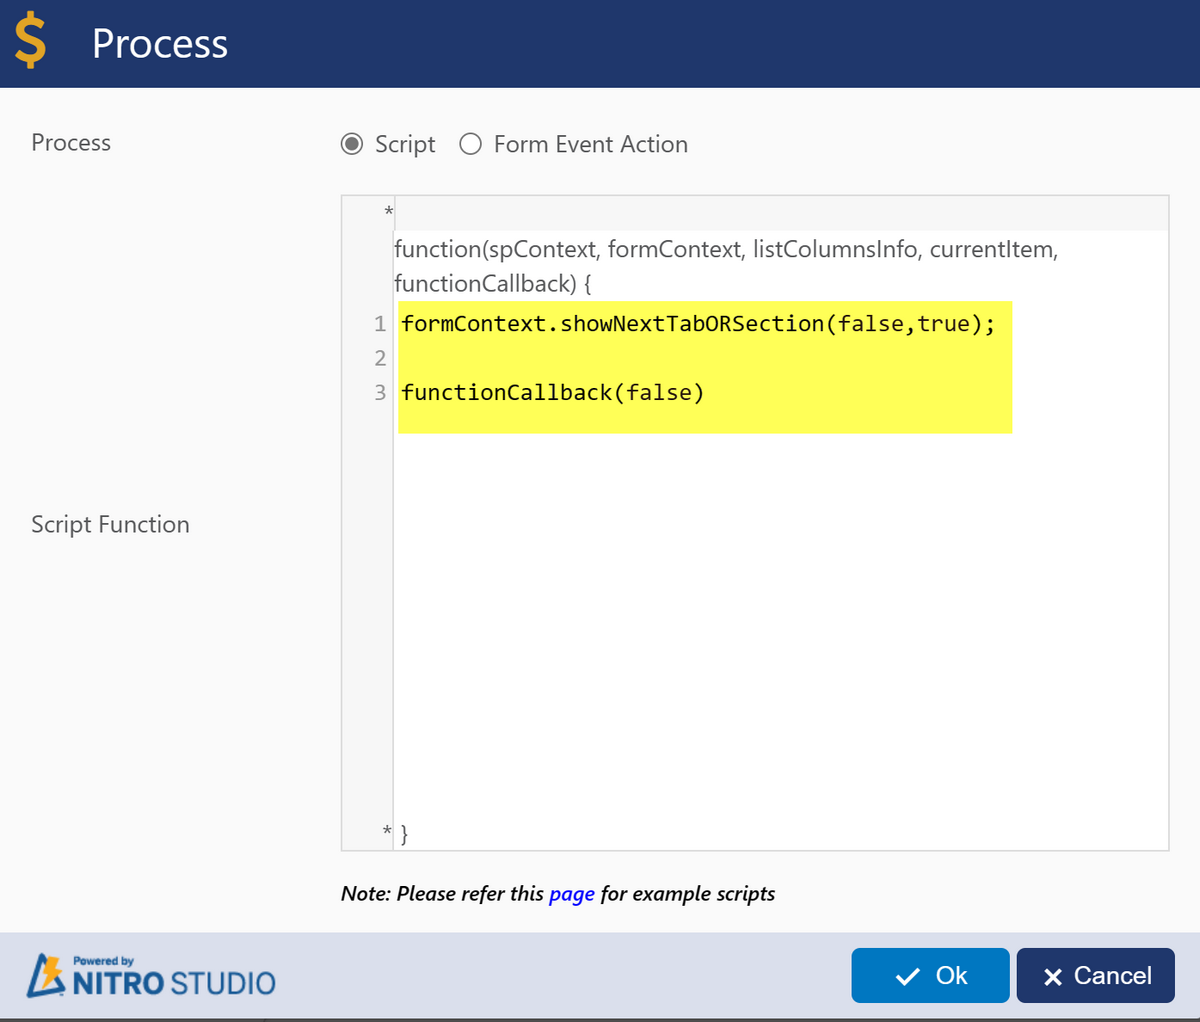
The JavaScript used above for the ‘Next’ button is:
formContext.showNextTabORSection(false,true);
functionCallback(false)
4.For ‘Staff’ tab, drag and drop two Script Action Buttons to configure the ‘Next’ and ‘Previous’ buttons as shown below:
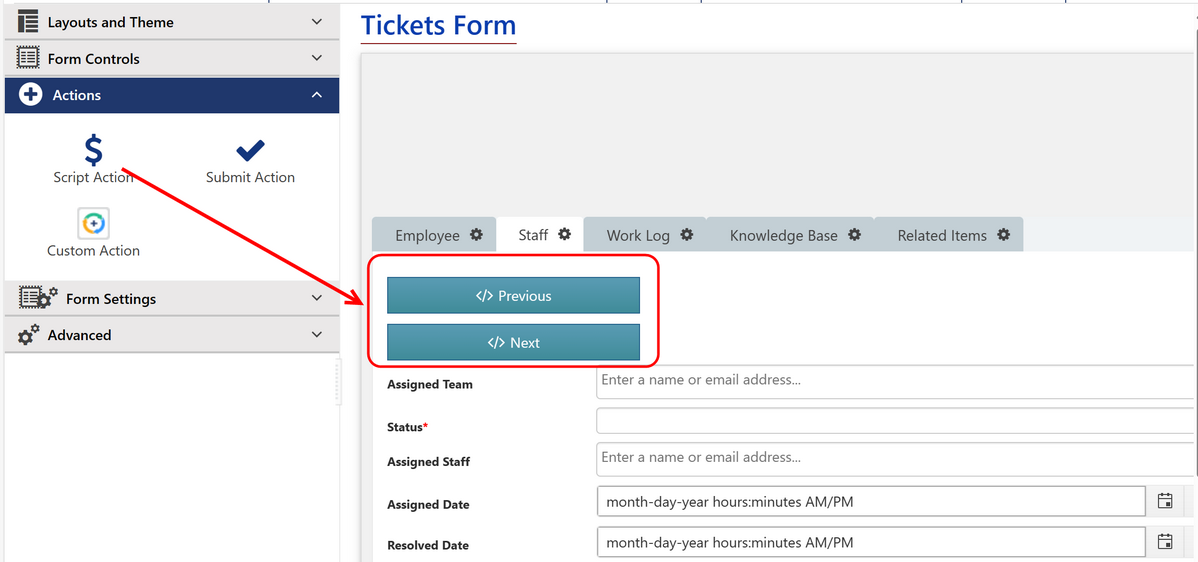
Note: Configuration for ‘Next’ button is same as described in above step.
5.The JavaScript Used for the ‘Previous’ button is as shown below:
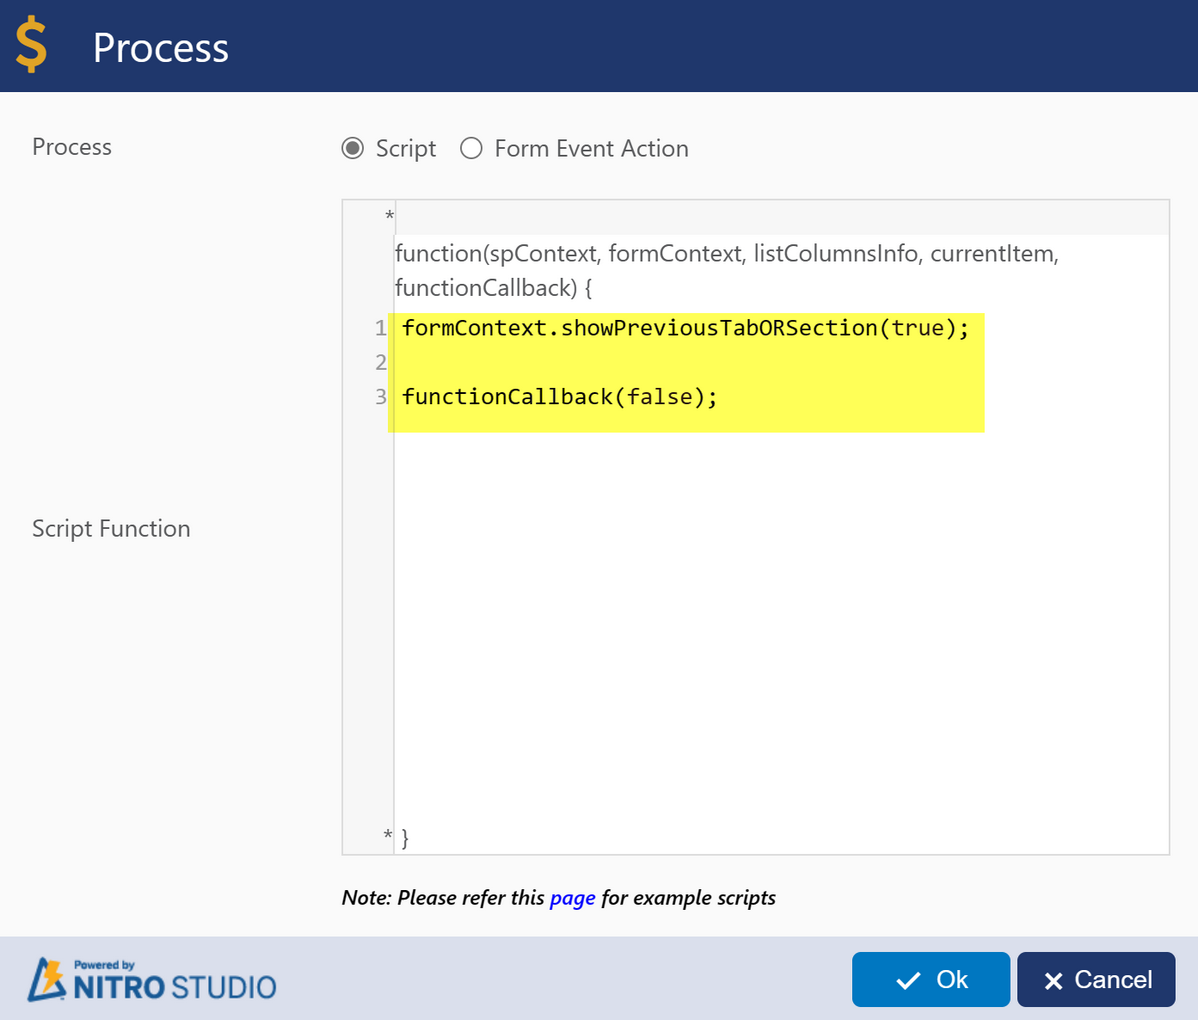
The JavaScript used above for the ‘Previous’ button is:
formContext.showPreviousTabORSection(true);
functionCallback(false);
Similarly, you can configure ‘Previous’ and ‘Next’ button for all tab by following above steps if required.
Note: After Configuring the button Settings, Click ‘Apply’ button to apply the settings.
Publish the NITRO form in the end.
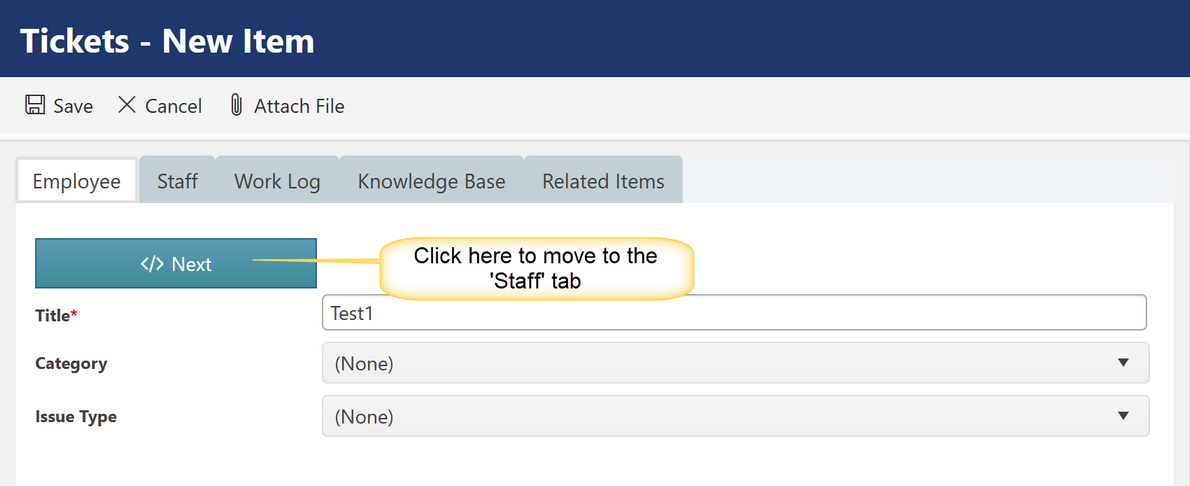
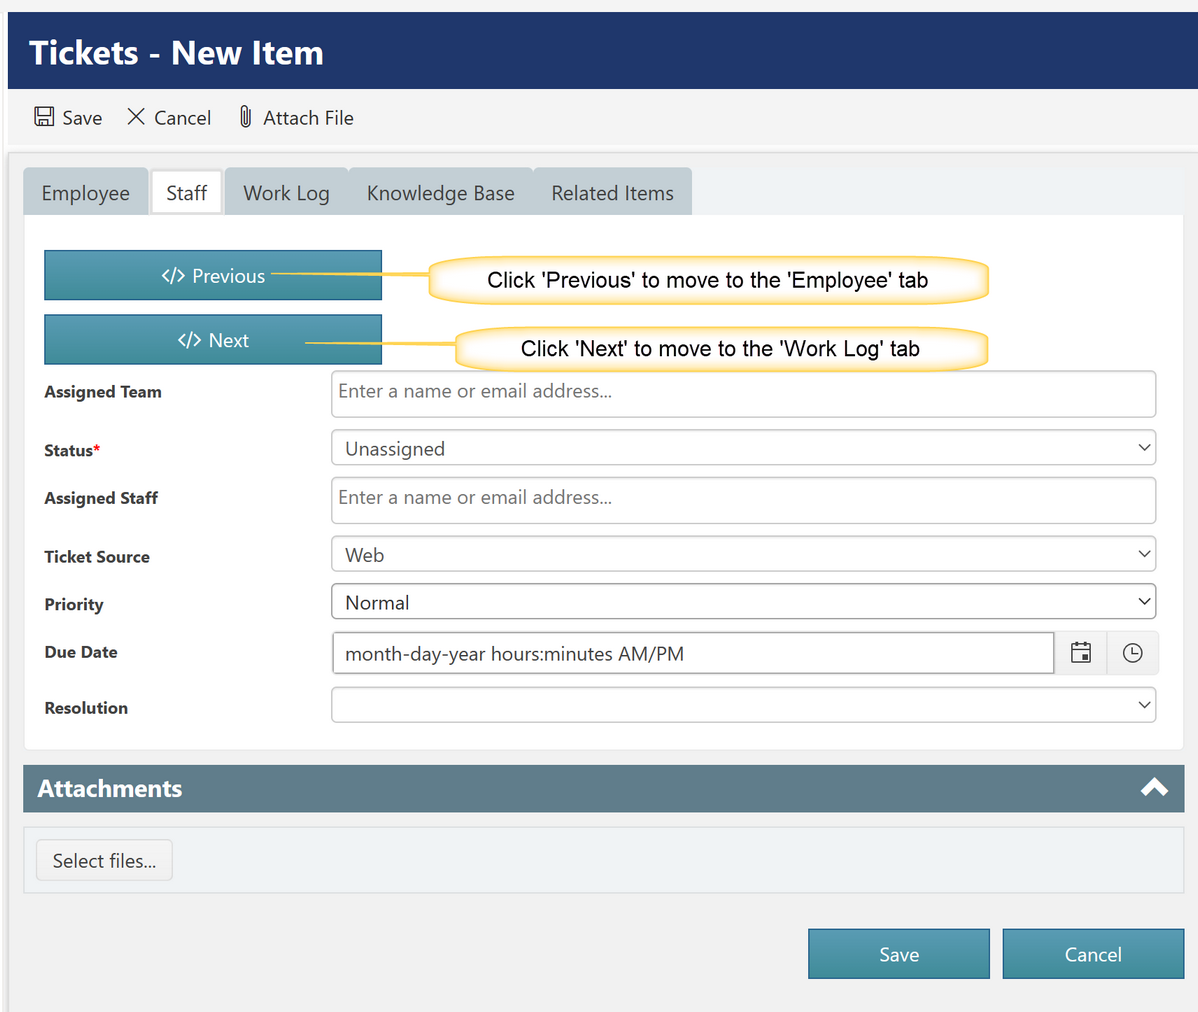
Sample Output of above configuration:
Use Case 2: Hide all the tabs and show only the ‘Next’ and ‘Previous’ buttons.
For this use case, the ‘Script Action’ buttons for ‘Next’ and ‘Previous’ can be configured as explained in the steps for Use Case 1.
However, to hide the tabs, the script for the ‘Next’ and ‘Previous’ buttons can be configured as explained below.
1.For the ‘Next’ button, the JavaScript used is as shown below:
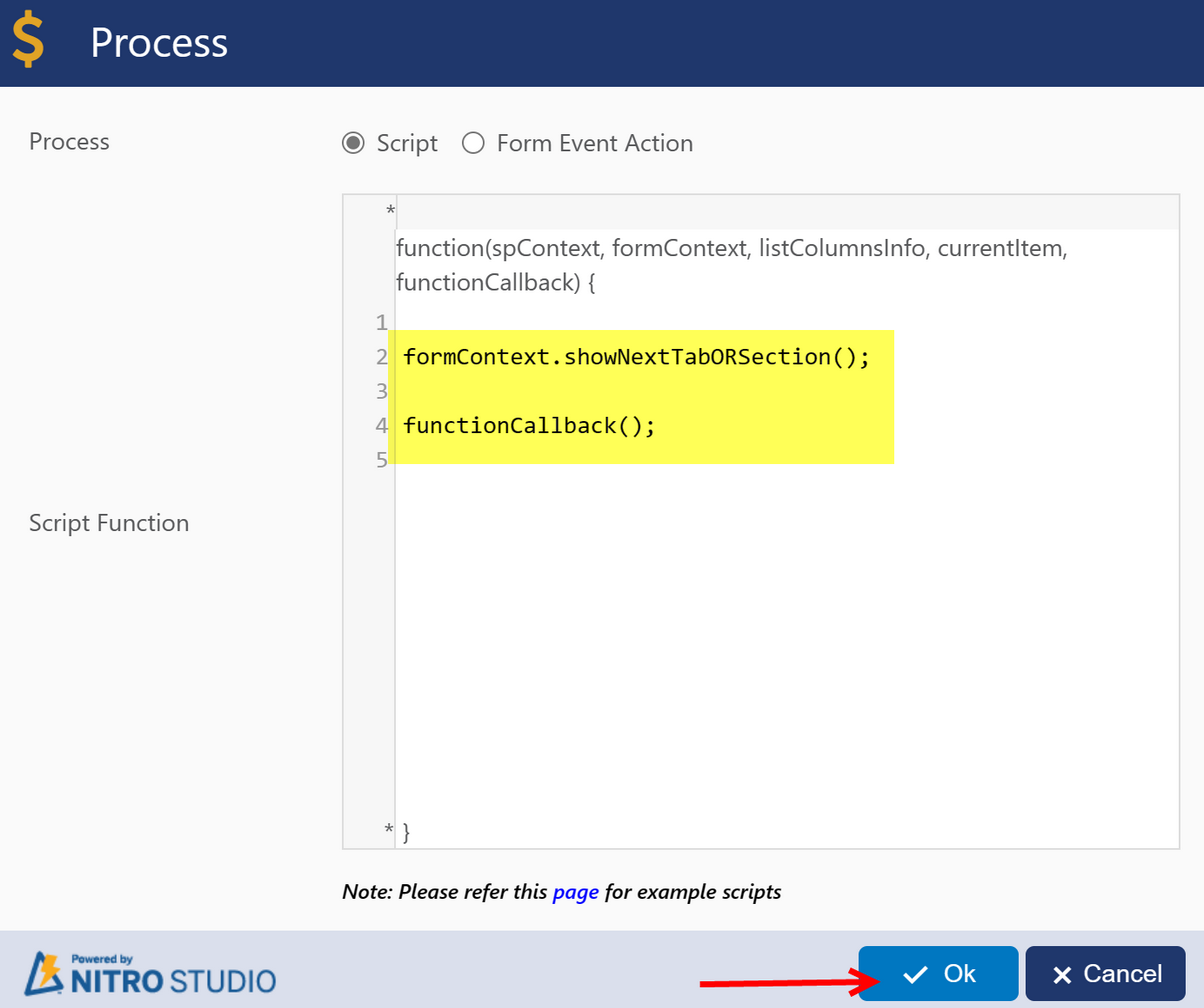
The JavaScript for the ‘Next’ button is:
formContext.showNextTabORSection();
functionCallback();
2.For the ‘Previous’ button, the script used is as shown below:
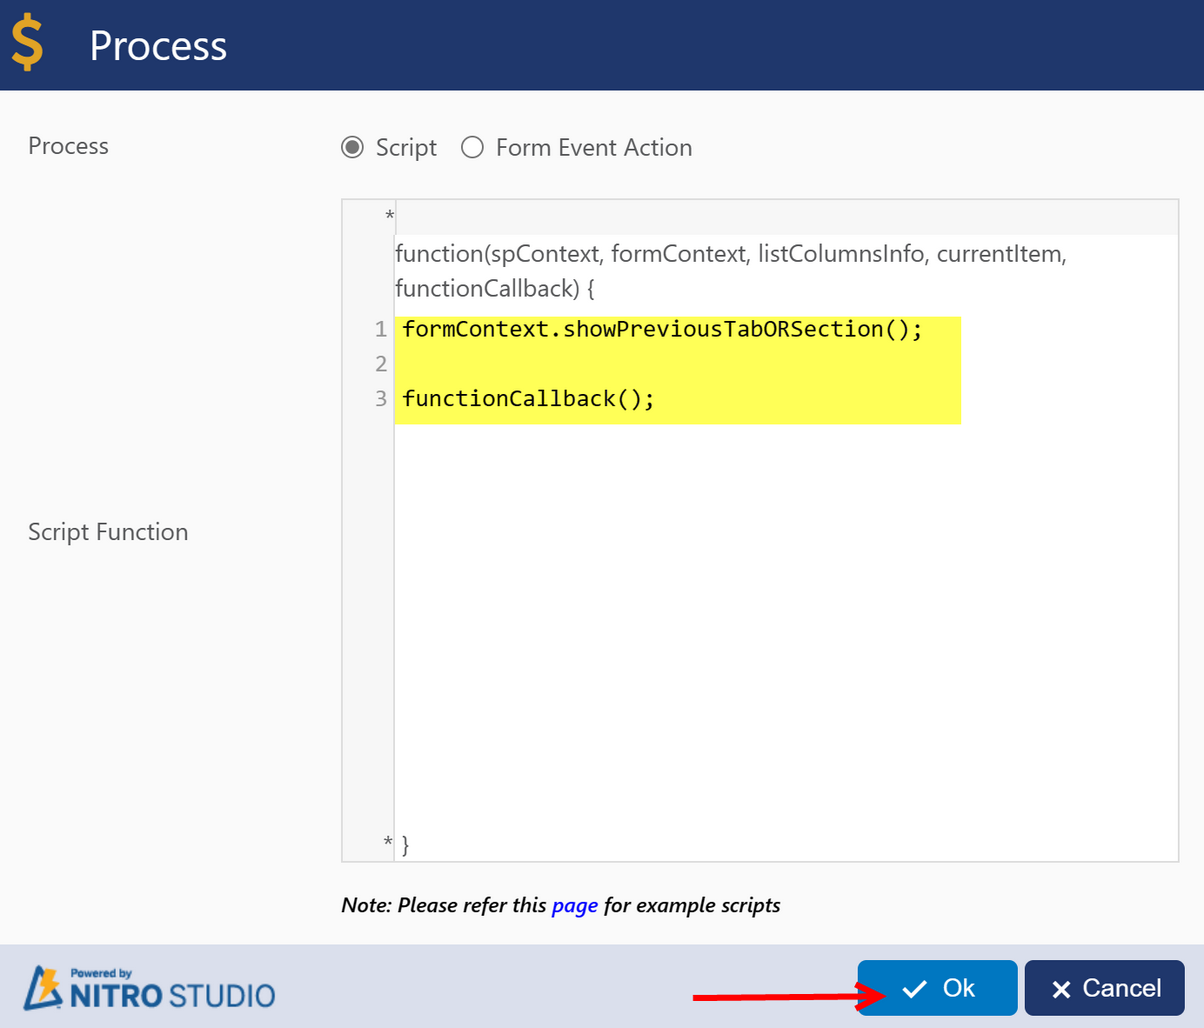
The JavaScript used above for the ‘Previous’ button is:
formContext.showPreviousTabORSection();
functionCallback();
Note: Above scripts for the ‘Next’ and ‘Previous’ buttons can be used in any tabs as per the requirement.
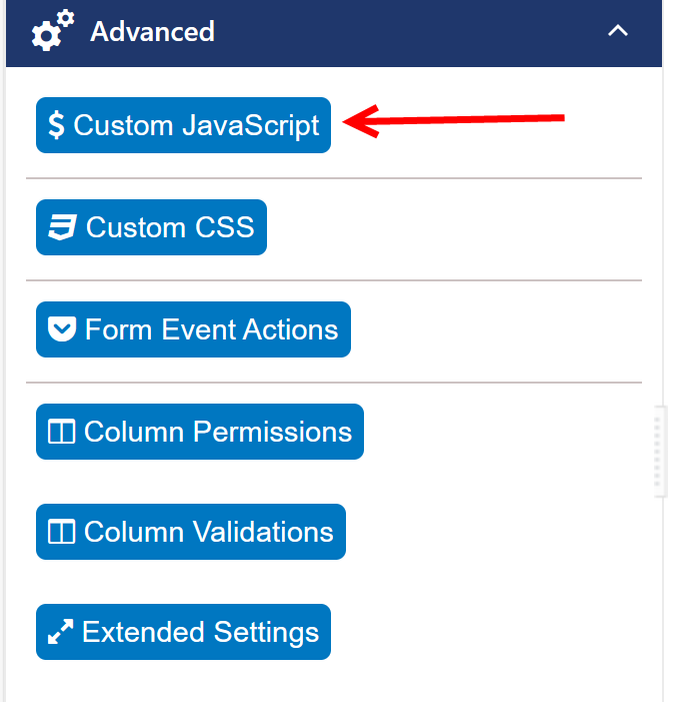
3.Apart from configuring the above scripts for the buttons, an additional JavaScript needs to be specified in ‘Custom JavaScript’ option.
Go to NITRO Forms designer page à Advanced section (present at the left side of the page) à Custom JavaScript as shown below:
4.In the opened window, use the script as shown below:
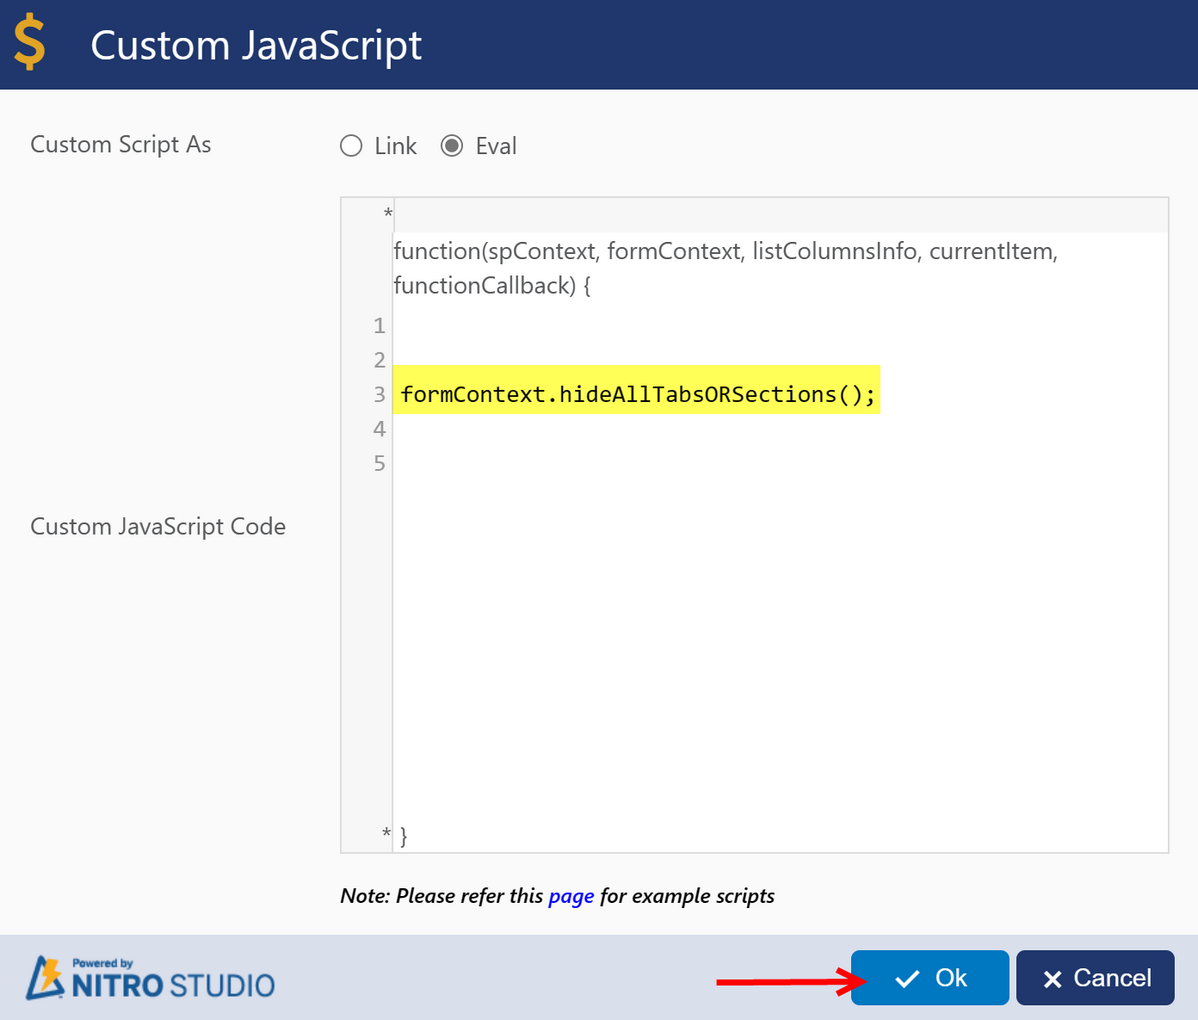
The JavaScript used above is:
formContext.hideAllTabsORSections();
5.After publishing the NITRO Form, the output will be as shown below:
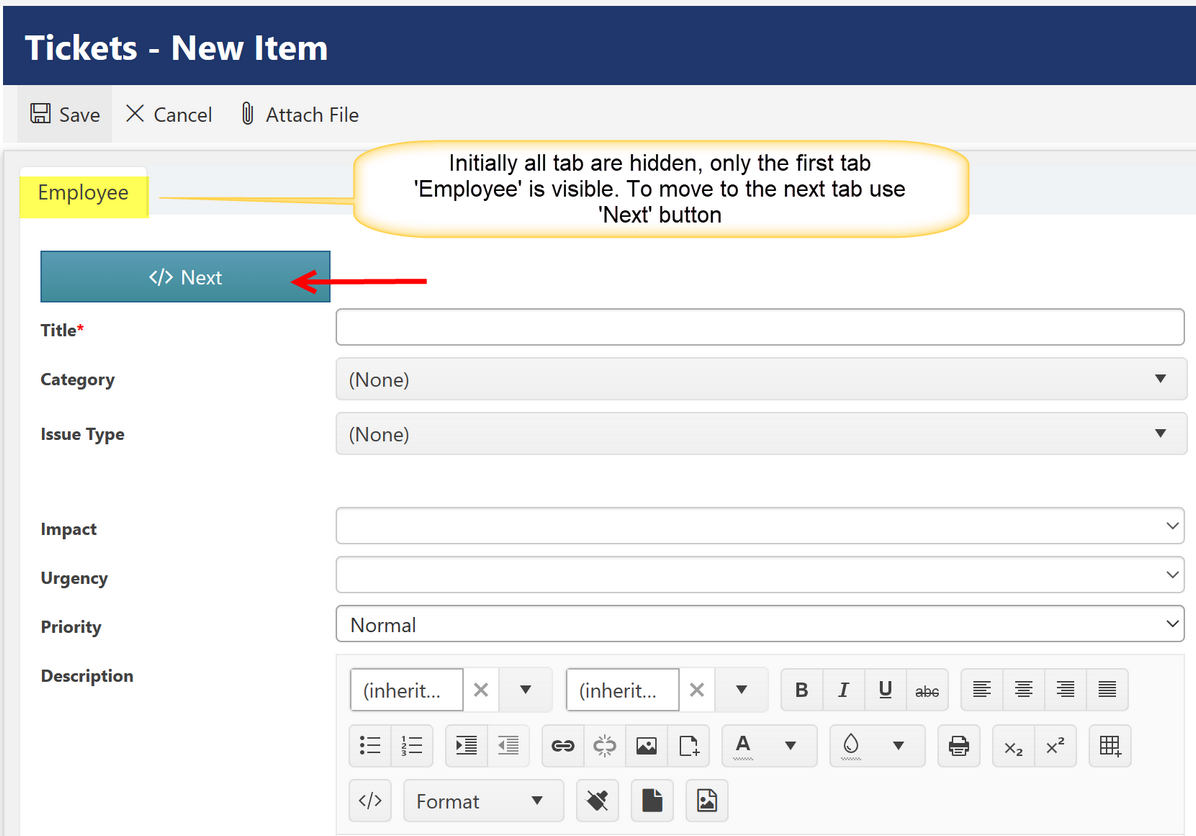
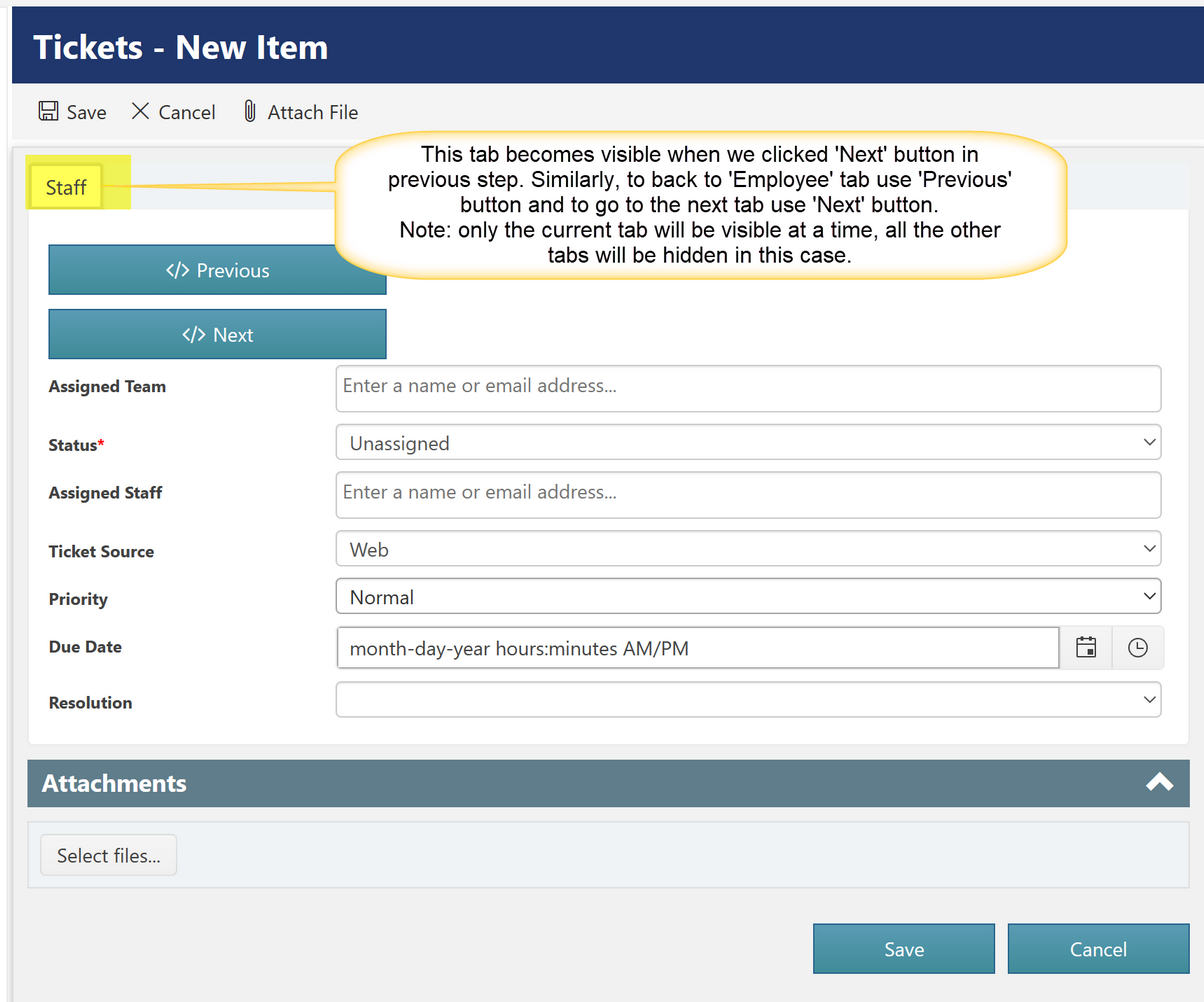
In this use case, when we click the ‘Next’ button to navigate to the next tab, the previous tab will be hidden and only the current tab will be visible as shown in the above screenshot.
Here, on clicking the ‘Next’ button on the tab ‘Employee’, shows the tab ‘Staff’ but, tab ‘Employee’ becomes hidden.
Note: All required columns values need to be provided before switching between tab.